Friday, April 29, 2011

Tomato and Onion Smothered Tofu: A Childhood Favorite

I'm friends with a lot of people who are all about the meat and potatoes which is all fine and dandy, but I get REALLY bored of that old regiment.  As a kid, I was always the one to reach for the plate of steamed veggies first or scoop up more pineapple and tomatoes than fish from my mother's sweet and sour seafood soup (ooookay, I'll blog that one... some time).  But, many years later, I married one of my meat and potatoes friends and have had three kids with him, one of which practically abhors anything green just like his father.  Much to my chagrin.  I've pureed and hidden veggies in the various cookies and cakes I've made for my kids, but the amount of sugar and fat in those recipes doesn't do much to boost their fiberous counter parts.

  Enter tofu, one of my all time favorite proteins.  I love it almost any way you can dish it up, from the gorgeous desert of silken tofu steeped in amber ginger sugar syrup found at Vietnamese fast food establishments to deep fried cubes stuffed with black fungus mushroom and onions (don't knock it til you try it!).  I'd take a plate of tofu over a hunk of chicken or steak almost any day!  The dish I'll be "preparing" for you today is one my Mummy dearest taught me to LOVE.  It's the vegan answer to spaghetti, best served over a bed of freshly steamed Jasmine rice with a generous drizzling of Sriracha hot sauce over top.  And for all you mamas out there, this is a great way to get your tykes to eat their veg and love them too; each serving packs a mega dose of lycopene rich tomatoes, antioxidant mega star onion and creamy, nourishing tofu.  Ah yes, be prepared to dazzle 'em with this goody goody gum drop!

Ingredients:

2 c vegetable (or your favorite) oil, for deep frying
8 ounce firm tofu, sliced half an inch thick
1/2 c corn starch
2 tbsp olive oil
1/2 medium onion, thinly sliced
1 tsp garlic, finely chopped
1/2 tbsp white sugar
3-4 medium Roma tomatoes (or about 1.5 lbs of your favorite tomatoes), roughly chopped*
1/4 c ketchup
1/4 c chicken broth 
1 tbsp fish sauce
1-2 tsp of Sriracha hot sauce

1. Drain tofu, slice 1 inch thick along length and layer between paper towels on a cutting board or some kind of flat dish.  Place another flat dish on top and weight down with something heavy (a couple cans of soup, for instance); set aside.

2. Heat oil in medium sized high sided frying pan or deep fryer over medium heat.  Pour corn starch onto a large flat plate; dredge slices of tofu, front and back, alternately until all slices are lightly dusted.  When oil has begun to bubble**, carefully slide tofu in and fry, 3 or 4 at a time (or as many as can fit without touching), stirring and flipping occasionally, until golden and crisp, about 4 minutes.  Process all tofu in the same manner and drain on paper towels.

3. In a medium sized heavy bottomed pot, heat olive oil.  Saute onions until translucent and slightly golden.  Stir in garlic, sugar and tomatoes; continue to saute until tomatoes are falling apart.  Stir in ketchup, chicken broth, fish sauce and Sriracha (if using).  Bring to a slow boil.

4. Quarter fried tofu slices and nestle into tomato onion sauce.  Cover and simmer over low heat for 10 minutes or until tofu has absorbed some of the sauce.

Serving suggestions: Dose a couple strips of tofu and the juicy tomato sauce over a bed of freshly steamed Jasmine rice.  Garnish generously with chopped cilantro and scallions and have a bottle of Sriracha hot sauce and a some fresh ground pepper on the ready for a spicy kick!


*Can also use canned diced or whole tomatoes.  Drain from juices before adding them in step three.  Remaining juice can be added as alternative to chicken broth for an extra saucy end product.  I've done this when tomato prices are too-much-and-thirty-cents a pound.  
**There are several methods of checking the oil for the correct temperature for deep frying: 1. Use a thermometer (350 F), 2. When small bubbles begin to break the surface of the oil, toss in a chunk of bread.  If it immediately floats to the top and bubbles collect around it, the oil's ready for frying, or 3. Insert tip of wooden chopstick into oil in center of the pan (where the heat is the highest).  When bubbles collect, oil is ready for frying.

Tuesday, April 12, 2011

Urban Spoon

Check out my reviews on Urban Spoon.  I'm a supporter of local/mom and pop type establishments and really hope to boost their business through my reviews!

<iframe frameborder="0" scrolling="no" src="http://www.urbanspoon.com/b/review_map/56/581474/Fresno-restaurants" style="width: 200px; height: 200px; border: 2px solid #003399; background: #eee"></iframe>

Monday, April 4, 2011

My First Almost Perfect Attempt at Macarons


I know the secret to perfect macarons: Italian, NOT French meringue.  Such a simple thing, yet so much less pulling out of hair.  Yes, my friends, sugar syrup will save your macaron-eating soul.  Recently, I had my second baby shower in preparation for Baby #2 to enter the world and since I had such a good time, I thought I'd treat my ladies to something their sweet tooth would not soon forget.  Sadly, my neck of the woods does not offer these little darlings in such a gorgeous variety that would be available in, say, San Francisco or Sydney.  What is a foodie to do?

My last attempt was actually pretty successful, although the batch produced (plain almond cookies with strawberry jam infused buttercream) was almost too sweet even for my taste.  I've solved this dilemma by subbing in a healthy dose of gorgeous mahogany cocoa powder for some of the confectioner's sugar and filling each little tender crisp cookie with a heavenly coffee flavored buttercream.  A shot of espresso in cookie form.  NIRVANA!

This recipe is based on a true tutorial by Another Blogger (http://www.myfoodgeek.com/2007/06/08/almost-foolproof-macarons/).  No offense, but I found a lot of errors in the recipe and thought I'd bring it to light for you lovely readers out there.  'Cause none of us likes to waste ingredients as precious as sugar and almonds and eggs, donchaknaw.


Ingredients:

For the macarons: 

120g egg whites, divided (about 5 large eggs)
35g sugar
150g sliced raw almonds

20 g cocoa powder
1/4 tsp salt
150g powdered sugar
For the sugar syrup:
150g sugar and 50g water


For the Coffee Buttercream: 
3 tbsp milk/water, heated 30 seconds at a time until hot
4 tbsp instant coffee granules 
1 stick butter, at room temperature
3 c confectioner's sugar

The Tools You Might Use (not in order of appearance):
2 heavy gauge aluminum half sheet pans
1 or 2 silicon baking mats (such as Silpat).  Parchment paper is also a fine substitute, although I would not recommend wax paper 
Stand mixer with whisk attachment (not necessary, but is MUCH easier on your arms and back when you're whipping the heck out of some egg whites and sugar)
You can use a hand mixer or even a conventional wire whisk if you're crazy and into that kind of pain and frustration
Food processor (such as the Ninja blender system, which is *cough* what I used and LOVE for many such applications)
Digital postage scale, for weighing all the ingredients.  This really does make a difference as far as accuracy goes.
Fine mesh sieve 
A bunch of cheap, flimsy paper plates
Probe thermometer with digital screen (looks like this: http://www.williams-sonoma.com/products/5710116/?catalogId=51&bnrid=3120901&cm_ven=Google_PLA&cm_cat=Cooks_Tools&cm_pla=Timers_Thermometers&cm_ite=All-Clad_Oven-Probe_Thermometer&adtype=pla)


Rubber spatula


Gallon sized zip top baggie


**To be honest, this is my personal laundry list of success with macarons.  You can probably make substitutions according to what's available in your kitchen, but I can't speak for how well things will turn out.  Macarons are creatures of environment, sensitive to harsh temperatures and conditions.**


Directions - Cookies:


  1. Preheat oven to 320 F.  Place a smal bowl onto the plate of a postage scale and carefully separate egg yolks from whites by gently passing the white through your fingers.  Pour into work bowl of stand mixer and hand whip until frothy*.  Place bowl onto stand mixer and whip on medium speed until tripled in volume and stiff peaks form (about 10 minutes total).
  2. Combine granulated sugar with water in a small heavy bottomed sauce pan and bring to boil over high heat.  Reducing heat, bring to 180 F on probe thermometer.  Sugar and water will combine to form a viscose light amber syrup.  Remove from heat.  
  3. Reduce speed of mixer to lowest speed, continuing to whip eggs while streaming in sugar syrup.  Small beads will form on sides of bowl and along spines of the whisk, but will not harm the meringue.  Continue to whip for another 2-5 minutes or through out the next step.  
  4. Grind almonds, powdered sugar, cocoa powder and salt to a fine flour consistency in the bowl of a food processor.  Sift onto paper plate to ensure even grind; replace any unground meal and pulse until all is the same consistency.  
  5. Remove meringue to a clean bowl, being careful to avoid the sugar crystals (I did this by way of a rubber spatula, dipping directly down into the center of the meringue away from the crystalized edge of the work bowl).  Gently fold almond/sugar/cocoa into meringue using a rubber spatula until completely combined; batter should be a very sticky pancake batter consistency.
  6. Place silicone mat onto doubled up half sheets* Place zip top bag onto a vessel big enough to hold it open and scrape as much batter in as possible.  Gather bag opening, pushing batter into one corner and twist bag into a tear drop shape.  Snip 1/4 inch off corner and pipe 1 1/2 inch circles directly onto silicone mat.  
  7. Rap cookie sheets with piped batter against counter once or twice by dropping from a height of about 1 inch or so.  This will settle batter firmly against silicone mat, allowing pied/feet to form in final baked product.
  8. Allow batter circles to rest in a cool dry place for at least 20 minutes, or until you can touch the tops without any batter sticking to your fingers.  This may take up to 40 minutes and depends on humidity and drafts in the room you're using.  A fan set to low a couple feet away will expedite the drying process.   
  9. Bake for 6 minutes, turn sheet around 180 degrees and cook for an additional 6 minutes.  Cookies will puff up more than out, with little bubbles/feet forming around the edges against the pan.  Let cookies cool on silicone mat on a cooling rack for 20 minutes before carefully peeling them off.  Inside should be moist while outside is crisp and dry to the touch.  
Buttercream:
  1. Dissolve coffee granules into hot milk/water and set aside to cool slightly.  Whip butter on medium speed until creamy and lightened in color.  Beat in sugar, 1 cup at a time, scraping sides continually.  Drizzle in dissolved coffee and continue to whip until well combined and slightly aerated.  
  2. Spoon into a 1 gallon zip top baggie, squeezing into one corner.  Twist corner of bag until all frosting is gathered into it and snip about 1/4 inch off.   
Finally, time to fill the macarons:

Flip all cookies so that moist side is up.  Match according to size, 2 per cookie.  Pipe buttercream concentrically onto one side, all the way to the edge and gently sandwich adjoining cookie on, twisting to assure adhesion.  Eat immediately with a cup of ice cold milk or hot cappuccino or store for up to 3 days in an air tight container.  Mine NEVER last more than 2 days, since they all end up in my belly too quickly.  


Look what you get to eat, now!!!! 

Macarons and chocolate/vanilla pinwheel cookies: a special gift received by each person at my recent baby shower. 

This recipe produces a gorgeous little cookie, tender-crisp on the outside, moist and brownie-like inside.  Cocoa powder and a touch of salt do wonders in balancing out the uber-sweet of the confectioner's sugar, while the coffee buttercream finish the flavors off in a rich note.  Try this one out, ya'll; I think you'll find the results to be a rather fine pay-off for any long cooking day.  Enjoy!  

Friday, April 1, 2011

Israeli Couscous Salad: Rice-A-Roni for the gourmand


I absolutely adore shopping for food.  It is one of, if not the very top, favorite of my pastimes; I even find myself sneaking away for little jaunts to the local market just to check out what's good and fresh.  Farmer's markets are next to dangerous for a gal like me, as the overload of fresh produce and seasonal availability makes over spending a last minute thought.  I guess you could say that grocery shopping is my answer to retail therapy.

A common brand of Israeli Couscous, although you bargain shoppers out there should know by the price tag where I found this little jewel


Large grain Israeli couscous used in today's dish

In this "episode" of Feng Shui Gourmet, I'm using an ingredient that many people have never ventured, or even thought to include in their menus: Israeli couscous.  Couscous (pearl and the finer grain variety) are all about texture.  Each variety is exceedingly simple to prepare, but yields large flavorsome quantities fit for any meal or gathering.  Try adding raw grains to your next soup, or cooked as a means to bulk up a pasta or leafy salad.  Be sure to season and flavor amply during the cooking phase as, like most starches, couscous is very bland on its own and loves the company of good taste.

Some great qualities, besides the flavors and fantastic mouth-feel of this dish, is that it is equally lovely to look at and a joy to prepare.  Do not be fooled by the long grocery list; this can be made with almost anything you've got in your fridge.  You just have to have a bag of couscous, a couple different vegetables (anything with an enthusiastic crunch), and your choice of protein (tofu and couscous might be on my next-to-try list...) to be on the road to unboring salad shangri-la.  What a tasty way to clean out the fridge!

Ingredients for Israeli Couscous Salad... :

1 8.8 oz packet Israeli (pearl) coucous
2 tbsp oil (olive oil preferred)
1/2 small onion (approximately 1/3 lb total), finely diced
1/2 tsp chopped fresh garlic
1/2 tsp freshly ground black pepper
1/2 tsp sea or Kosher salt (1/4 if using table salt)
1 3/4 c boiled chicken broth
OR
1 3/4 c boiled water
2 tsp chicken bouillion
2 c Asian broccoli salad (recipe below)
15-20 shrimp, shelled, deveined, seasoned with lemon pepper and grilled 1-2 minutes per side (or until pink through)
4 rashers of bacon, crisped and sliced into lardons (1/2 inch width-wise ribbons)
1/2 large lemon (approximately 1/5 lb total weight)
Zest of the 1/2 lemon


... And for Asian Broccoli Salad (not pictured):
2 heads broccoli, washed, dried, florets trimmed from stems
2 stalks celery (about 15 inches long each), diced
OR
1 small bag of broccoli salad mix (largely contains broccoli, carrots, and a bit of purple cabbage).
1/4 large yellow onion (about 1 lb total weight), finely diced
1/2 c fresh snap peas, sliced on the bias 1/3 inch wide
1/2 c bottled Asian dressing (I recommend Kraft Sesame Dressing)
2 tbsp mayonnaise


Garnish: 
Fresh cilantro, either a couple sprigs or about 1/4 c, roughly chopped
1/4 c sliced or slivered almonds, toasted
Shaved lemon zest, finely slivered

*can be used as garnish or chopped up in chunks and mixed into salad

Cover your work surface with a clean kitchen/tea towel (trust me, this will save you about 15 minutes of clean up time after all is said and done).  On a large cutting board, chop broccoli florets into bite-sized pieces.  Using either a sharp chef's knife or a mandolin fitted with the smaller toothed blade, cut broccoli stems into matchsticks on the bias.  Alternately, if using bagged broccoli salad mix, gently combine with the rest of the ingredients until a slaw-consistency is reached.  Refrigerate for at least 1 hour before serving.  Keeps for up to 2 days in refrigerator.

Untoasted couscous

Directions for Israeli Couscous Salad

1.  Heat high sided frying pan over medium heat.  Add 2 tbsp oil, turn to coat and add couscous, shuffling pan occasionally for even toasting.  Allow to toast until most grains are toasted, about 5 minutes total (watch very closely).

2.  Add diced onion and garlic, stir to combine.  Boost heat to high and add chicken stock OR water with bouillon (should bubble up around edges without boiling over).  Stir to combine, cover tightly with lid and lower heat.  Cook six minutes, stirring at 3 minute mark.

Nicely tanned.

Addition of onions, garlic and pepper.

Sizzling hotness after addition of broth/water 


3.  Remove lid after 6 minutes are up, stir quickly to ensure bottom cooks evenly, replace lid and remove from heat.  Continue to cook for an additional 5 minutes or until couscous is al dente.

4.  Scoop cooked couscous into a large work bowl and gently stir to combine with two cups of broccoli salad, bacon, shrimp (if not using as garnish) and lemon zest.

... Et, voila!  Israeli Couscous Salad in all its textural glory!


Serving suggestions:
Place about 1 cup of couscous salad into a rimmed plate, top with whole grilled shrimp and a generous sprinkle each of cilantro and toasted almonds.  Garnish with slivered lemon peel.

Or

Place entire salad into an attractive dish with shrimp fanned out over the center.  Sprinkle generously with cilantro and toasted almonds.  Garnish with slivered lemon peel.  For either application, serve with a plate of quartered fresh lemons on a plate of its own, allowing each person to season to taste.

This salad can be eaten at any temperature, even the day after straight out of the refrigerator as a side dish, snack or even a hearty meal.  If storing in fridge for later use, reserve garnishes for just before serving.


Tuesday, March 29, 2011

Whiskey Chicken: My Way W/Bourbon Chicken


It's a rare thing for me to buy skinless, boneless chicken breasts these days.  For one thing, they're so darned expensive most of the time, I'd rather do all the work myself and pocket the extra eight some-odd dollars I would have spent.  Ribs attached and skin on, to me, equals longer cooking time, but results in AWESOME flavor, texture and all-over aesthetic appeal.  But low and behold, i found a good sale on boneless skinless chicken boobs at my local gigantic food storage house (known to Americans as "Suuuuupermarkets").  $1.09/lb, and that wasn't including the styrofoam plate or plastic wrap.  Got four HUGE breasts for four dollars, a deal any cool would probably be quite proud of (or most men, for that matter).

  Another problem is, because I know how to cook and I get bored doing the old humdrum meat, starch and two veg' deal, the prized meat has to sit in the fridge for  a while until I figure out how to present them without annoying myself.  Much to my husband's chagrin, although he usually enjoys what I come up with, I like to experiment with my food.  Ah, yes, the bane of being married to a foody.  Any how, this time around, the food court was what sprung to mind as I thumbed through my mental cooking Roladex: bourbon chicken!  In came another problem: I'm eight months pregnant, my feet are useless stumps of soreness at the ends of my swollen legs.  Going to the store could prove quite problematic, if not very painful, at this point in the game, plus even before I reached this current state, I never cared for bourbon or most of the other hard liquors out there.  WHAT DO I DO??!!

  A quick search on allrecipes.com produced several tutorials for our beloved food court staple, all insisting on the use of that darned nasty tasting brown hooch.  Then it occurred to me: we were still in the possession of a bottle of Jameson Irish Whiskey from several moons ago when it seemed like a good idea on St Patty's day.  The gamble of this swap seemed irresistible and worth it since my craving for poultry goodness was snowballing by the second.  So here it is: Whiskey Chicken, my way.  Take it or leave it!

Ingredients:

1 1/2 lb skinless boneless chicken breasts or thighs, cut into 1 inch cubes (thighs will be more succulent, but it's your shout)*
3 tbsp vegetable oil (about 5 fast turns from a squeeze bottle)
Another 1 tbsp oil (this will make sense if you read the directions)
1/4 c finely diced yellow onion**
1/4 c chicken broth (homemade preferable, or use Swanson's Low Sodium Chicken Broth)
1/4 c grape juice (or whatever juice you've got on hand)
1/4 c Jameson Irish Whiskey
1/4 c soy sauce
2 tbsp brown sugar
3 HUGE cloves of garlic, grated (micro plane or a fine-toothed handheld grater works best for this job)
1/2 inch piece of ginger, grated (repeat above statement)
2 tbsp cider vinegar
1 tsp red pepper flakes
1/2 tsp freshly cracked pepper
1 tbsp corn starch

*If you opt to leave the skin on, you will find this to be a very greasy dish.  Trust me, I've made this mistake, served it to my Mum and now I've lived to tell you NOT to do this.
** The instructions from the allrecipes.com recipe said to use 1 tbsp of dried onion flakes, but I don't keep those on hand.  I think onion powder, about 1 tsp, would do the trick too if you're feeding people who have onion-detectors in their mouth/nose.  I chopped my onion pretty fine and it melded nicely with the sauce, plus the long cooking time helps, too.  If you choose to use powder, you'll whisk it into the liquid step of this here recipe.  Because powder and hot oil burn together, donchaknaw?

Directions:

Browning the diced cluck cluck.

Frony, fron, frond! So tasty and... good!

Heat a medium non-stick pan over medium heat.  Add oil and brown chicken in 2 batches, or until all is processed.  Should take about 2 minutes per side for nicely tanned chicken.  Chicken will still be quite pink on the inside.  Transfer to a bowl and set aside.

Whisk together everything from broth to cracked pepper.  Add an extra tablespoon of oil to that lovely frond-y goodness collected at the bottom of your pan (or the brown bits) followed by the diced onions.  Stir to collect the flavorful brown bits.  Boost heat to high and pour in most of the whiskey-broth mixture, save for about 1/4 cup or so.  Allow liquid to come to a boil.

Whisk corn starch into remaining liquid then quickly whisk the slurry into the boiling liquid.  Add browned chicken to the pan and continue to boil for about 5 minutes or until chicken is cooked through.

Reduce heat to low and cook for at least 15 minutes, or if you have time, up to 4 hours, simmering to tenderize chicken pieces*.  Serve hot over Jasmine rice with your choice of steamed vegetables and a couple spoon-fulls of the cooking liquid.  Liquid should be viscose but not gelatinous.  If necessary, add extra corn starch mixed with water 1 tsp at a time until desired consistency is reached.

*This is a great dish for the crock pot, since you can allow it to stew for several hours throughout the course of the day.  Just add the chicken to the boiling liquid, skip the slurry and simmer for as long as you can (up to 8 hours).  When you're ready to serve, add slurry of corn starch and cold water and bring to a boil until thickened to desired consistency.

Thursday, March 24, 2011

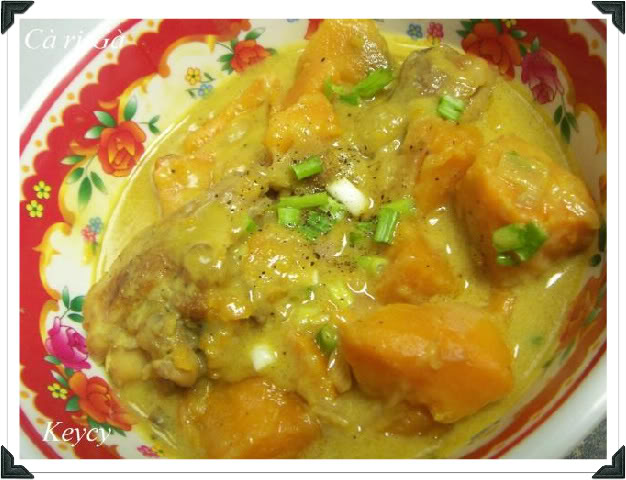
Cari Ga: Vietnamese Chicken Curry


Apparently I posted this on my Facebook page a while back, but I honestly have no recollection of such an event.  This is the closest thing to what my Mแบน used to make (and still occasionally does): a flavor-rich soup dotted with chunks of carrot, potatoes and best of all tender dark and white meat chicken.  For the flavors to meld and for the chicken to become toothsome and tender, the broth and chicken, along with all the spices and aromatics, are brought to a boil, then left to simmer over super-low heat for at least a few hours.  Your entire house will be perfumed with a heady bouquet of cumin, coriander, and turmeric, all of which are the signature of a fine curry powder.  Simple to produce, with plenty leftover to freeze for later if you choose, my favorite way to serve this is lovingly drizzled over a bed of tender Jasmine rice, fresh out of the rice cooker, with a generous sprinkle of rough chopped scallions and cilantro.  And just to make this a triple-starch kind of meal, I serve a skinny French baguette, cut into thick fingers and lightly toasted under the broiler, as a means to sop up all of those glorious tawny  juices.  This is my robust provocation to America's bland chicken noodle soup, an old stand-by that's often touted as "comfort for the ailing", though it doesn't hold a candle to even the memories of slurping down a bowl of this delicious consomme.  Bring out the napkins and rev up your taste buds for a taste of Vietnam you'll never forget.  


Adapted from Mai Pham's Pleasures of the Vietnamese Table "Bun Cari: Curry Noodle Soup with Chicken"


Ingredients 


1 tbsp vegetable oil
1/2 of a large onion (about 1 lb), diced
2 cloves garlic
1 tsp ground chili paste (optional)
1/4 tsp cayenne pepper (optional)
3 tbsp curry powder
1/2 lb bone-in skinless chicken thighs, sliced into 1-1/2  inch thick chunks
1/2 c unsweetened coconut milk
OR 1/2 c milk (whatever fat percentage you have on hand; higher percentage = richer results)
4 c homemade chicken stock (see recipe below)
OR 
4 c store bought chicken broth (recommended Swanson's Low Sodium Chicken Broth)
1/4 tsp ground turmeric
3 tbsp fish sauce
1 tsp sugar
1 large Russet potato, peeled and cut into 1 inch square cubes
2 medium carrots, peeled and cut on the bias into 1 inch slices
1/2 c cilantro, stems and leaves rough chopped
1 c shredded romaine
1 c bean sprouts
3 c cooked Jasmine rice
OR 
1 lb dried bun (small rice vermicelli or rice stick noodles), cooked per package directions
4 scallions, thinly sliced


Chicken Broth


1 4 lb whole young chicken, giblets removed
2 stalks of celery
2 carrots
1 large onion, quartered with skin on
8 qts cold water, plus more for topping off
1 tsp black pepper corns
1 large bay leaf


Combine all ingredients in a large stock pot, cover and bring to a boil.  Remove cover once boiling to prevent overflow.  Allow to boil for at least 20 minutes before lowering heat.  Simmer for at least 4 hours, carefully skimming any scum or muck from the surface every so often.  Drain through a fine mesh sieve, separating chicken from aromatics.  Remove skin from chicken, then chunk or shred the flesh; set aside for later use.  Should produce about 4- 32 ounce containers of clear stock.


Directions


1.  Heat oil in a medium pot over moderate heat.  Add the onion and garlic and stir fry until onion turns translucent (watch this step carefully, as minced garlic has a tendency to burn quickly).  Add the chili paste, cayenne (if using either) and chicken and stir to coat, and until all sides are lightly toasted, about 3-5 minutes.  Add chicken broth, turmeric and sugar.  Bring to a boil, then reduce heat to a simmer 


2.  Add potato and carrots and continue to simmer for 20 minutes or until potatoes are tender.  Stir in coconut milk and fish sauce and continue to simmer for another 30 minutes.*  Taste and season with either more fish sauce or salt, but go sparingly because flavor and salinity will intensify as it sits.  When you are pleased with the flavor, arrange a scoop of rice in the center of a shallow saucer and course a hearty ladle or two of the soup over it.  Alternately, if using noodles, reheat a serving until they are tender and steaming before adding soup.  Shower with cilantro and scallions and a heavy grind of freshly cracked pepper over all.  Serve plates of Romaine lettuce, cilantro and bean sprouts and freshly toasted fingers of French baguette bread family style for people to add as they please.  SOUP IS ON, BABY!


* Adding the fish sauce at the last minute like this will prevent the strong aroma from permeating throughout your house.  Additionally, adding the coconut milk/milk at the last second will prevent curdling.  


Friday, March 18, 2011

Rack O' Lamb with Remoulade Crust

This recipe, like some of my other ones, looks daunting because of the sheer length and detail of it.  Please don't be fooled, Save for the rack of lamb, I'm willing to bet that most of you have the bulk of the ingredients on the ready in your pantry and fridge.  The "procedure" is very simple and moves quickly if you lay everything out and do things in an orderly fashion.  This is one of those recipes where having your mise en place (literally translated to "putting in place", and basically means having everything in order before you start)  is imperative for feng shui to exist in your kitchen, and for your sanity to remain intact.
Close your mouth, dear.  It's not polite to stare (but in this case, it ain't gonna hurtcha!)  

With that said, this is not my first time making a rack of lamb.  Growing up in Australia, you'd think that I would have eaten my fair share of chops and racks, but until about 2 years ago, I was a virgin in these waters.  I, like many others, had heard horror stories of the young meats gamey-ness and strange odor and had just assumed I wouldn't care for it.  After much coaxing (and even the consumption of some elk, venison and other game meat generously gifted to us by a dear family friend), I decided to try my hand at preparing this BEAUTIFUL choice cut.  Now, I'm preaching to the world that lamb is indeed a delicious and easy to prepare protein that has amazing depth of flavor and impressive on the plate.  And to those mums and dads out there who think their kids won't want to even give this a whirl, present these babies as meat lolly pops that taste like the best steak they've ever had and see them turn into mini-foodies.


Everything you'll need for a successful Rack o' Lamb if you choose not to make the remoulade.


2 Slices of your favorite bread (I used 1/2 of an everything whole wheat ciabatta roll)
4 cloves of garlic
2 tbsp oil
2 1/2 tsp dried or 2 tbsp fresh rosemary
1/4 tsp black pepper
1/2 tsp salt

Preheat oven to 450 F.  Cut/tear bread into chunks; coarsely chop garlic cloves.  Place both in bowl of food processor with oil, rosemary pepper and salt.  Pulse to form a wet sand consistency.  Remove blade from bowl, rinse and load into dishwasher.  Set bread crumb mixture aside.

A good coarse consistency = tasty, crusty goodness! 


Remoulade (mustard sauce; adapted from Emeril Lagasse's recipe found on Foodnetwork.com)

3 tbsp dijon mustard or a good strong brown mustard
3 tbsp yellow mustard
1 heaping tbsp mayonnaise
2 tbsp chopped parsley
1/4 c fresh lemon juice
1 tsp whole mustard seeds
3 - 5 tbsp olive oil
2 tbsp garlic, chopped
3 tbsp ketchup
4 scallions, medium in length, rough chopped
1/4 medium (about 1/2-3/4 lb) onion, roughly chopped
1/2 tsp cayenne pepper
1 tsp ground pepper

or 2 or 3 tbsp dijon mustard

Combine all ingredients in a food processor, Pulse until everything comes together in a thick paste and no large chunks remain.  Makes about 1 1/4 cup.


1 1lb Frenched lamb rack
Salt and pepper
1 tbsp oil

Seconds before getting browned into tender submission


If one is available, pre heat a large cast iron skillet or griddle over medium heat for at least 5 minutes.  Alternately, a heavy-bottomed stainless steel pan works just as well; pre heat over medium heat until splash of water disappears immediately.  Rinse lamb and pat dry with paper towels until the surface is dry enough that you can click our fingers.  Season with salt and pepper to taste (about 1/2 tsp each).  Drizzle oil onto hot cooking surface and sear meat at least 2 minutes per side including the ends, or until golden brown all over.

LOVE that sizzzzzzzzle!


Place a foil-lined baking sheet into hot oven.  Cover Frenched bone ends with a bit of foil to prevent charring.  Spread a thin layer of remoulade* over all exposed surfaces of browned meat.   Press bread crumb mixture over fatty top surface of rack, creating a thick, consistent layer.  Remove baking sheet from oven, apply cooking spray and place breaded rack in the center.  You should hear a soft sizzle, which will continue to sear the bottom of the rack.  Place in hot oven and roast for 15-20 minutes, or until meat thermometer inserted into side of rack reads 140 (160 for well done).  When time is up, remove rack to cutting board and tent loosely with foil for 10 minutes before slicing 2 chops at a time.

My plate: a couple of medium-well chops, baked potato, roasted snap peas and a light salad.  Or, what my dear mother in law would refer to as "meat and puhtaytuhs" (it's a midwestern thing).   


Serves 2 really hungry people or 4 with sides and salads.

* You could easily use plain dijon mustard, about 2 to 4 tablespoons should be adequate to cover.

And hubby's more attractive plate.  If you slice 'em 2 x 2, the crust doesn't fall off.  Either way, it all tastes faaaaaabulous!