Tuesday, June 28, 2011

Chocolate Stout Cake


The original chocolate stout cake donut served on Father's Day, 2011

I originally made this cake as a way to use at least part of a bottle of chocolate bock my husband had deemed unpalatable.  As a lover of all things vanilla, he felt it was "just too chocolatey".  The plan was to serve it after a scrumptious lunch at Farmer Boys on Father's Day, which worked out quite nicely as a rich back drop to our greasy spoon affair.  Between this and the lemon yogurt cake I made for my dear old husband, we each savored the sweetness of each other's company until the last crumb was devoured.

Although the chocolate bock lent a nice flavor, I much prefer the smooth, almost coffee like taste of Guinness, but really you can use what ever dark stout beer you like.  This is a simple cake to prepare which can be decorated however you please, but is best enrobed in melted semi-sweet or dark chocolate just to make sure people know what flavor is boss.  Serve this up with a shot of espresso and maybe a dollop of freshly whipped cream and you've got a dessert that'll make the biggest chocolate fan sing!

A fantastic start to a gorgeous cake!

Chocolate Stout Cake
Adapted from Tracey's Culinary Adventure, who adapted it from Bon Apetit

Aaaaah... the good stuff!

Chocolate Stout Cake
adapted from the Barrington Brewery in Great Barrington, MA via Bon Appetit (via Smitten Kitchen)

1/2 cup stout (I used Guinness) 
1/2 cup (1 stick) unsalted butter
1/4 cup plus 2 tablespoons Dutch-process cocoa powder

1 tbsp granulated coffee*


Stout, coffee and a stick o' butter = YUMMERINO!

Whisking everything together

1 cup all-purpose flour
1 cup sugar
3/4 teaspoons baking soda
3/8 teaspoon salt
1 large egg
1/3 cup sour cream**
3 ounces semisweet chocolate
1 tsp vegetable oil


To make the cake: Preheat oven to 350 F.  Spray a round spring-form pan well with cooking spray and dust with flour.***

In a large saucepan set over medium heat, combine the stout and the butter.  Stirring occasionally, bring the mixture to a simmer.  Remove the pan from the heat and whisk in the cocoa powder and coffee granules until the mixture is smooth.  Set aside to cool slightly.

Meanwhile, in a large bowl whisk the flour, sugar, baking soda and salt together.  In the bowl of a stand mixer fitted with the paddle attachment, beat the egg and sour cream until well blended.  Add the slightly cooled stout mixture to the bowl and beat to combine.  Add the flour mixture all at once and beat briefly on low speed to begin to incorporate.  Remove the mixer bowl and use a rubber spatula to fold the batter to finish incorporating the dry ingredients.

Transfer the batter to the prepared spring-form pan.  Bake for 30-32 minutes, rotating pan 180 degrees at the 15 minute mark for even baking.  Center of cake should spring back when gently pressed.     Transfer the pan to a wire rack and allow to cool for 10 minutes then turn the cake out of the pan and set it on the wire rack to cool completely. 


Microwave semi-sweet chocolate in a glass measuring cup for about 30 seconds increments (each microwave is different so set the time and stay close by) until most of the way melted through.  With a smooth, mix in oil until well incorporated into chocolate and forms a smooth glaze.  Immediately pour over cooled chocolate sponge, allowing excess to pour over from edge to edge.  For a garnish, zest an orange over the ganache and sprinkle some coffee granules over the center.  Serves 8.  


Velveteen chocolate stout batter


This bad boy is ready to load into the magical hot box! 

*Decaffeinated coffee granules are great for those of you who are sensitive to caffeine
** I used mayonnaise instead because that's what I had on hand.  Could not taste the difference.  


*** The best way to do this is to dump about a cup of flour into the greased pan, shake, roll and wiggle the pan until all surfaces are covered, then invert the pan over the flour container and tap out the excess powder.  

Monday, June 27, 2011

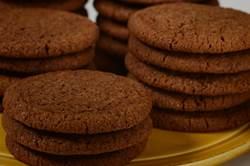
Ginger snaps: a spicy snappy sugar cookie

This is going out to one of my followers who is a BIG fan of these tasty morsels.  
Gingersnap Cookies
In the bowl of your electric mixer (or with a hand mixer), beat the butter and sugars until light and fluffy (about 2 - 3 minutes). Add the molasses, egg, and vanilla extract and beat until incorporated. In a separate bowl whisk together the flour, baking soda, salt, and spices. Add to the butter mixture and mix until well combined. Cover and chill the batter for about 30 minutes or until firm. 

Preheat the oven to 350 degrees F (180 degrees C). Line two baking sheets with parchment paper.

Place about 1 cup (200 grams) of white granulated sugar in a medium sized bowl. When the dough has chilled sufficiently, roll into 1 inch (2.5 cm) balls. Then roll the balls of dough into the sugar, coating them thoroughly. Place on the baking sheet, spacing about 2 inches (5 cm) apart and, with the bottom of a glass, flatten the cookies slightly. 

Bake for about 12 - 15 minutes or until the cookies feel dry and firm on top.  (The longer the cookies bake, the more crisp they will be.) Cool on a wire rack. 

Makes about 4 dozen cookies.


Gingersnap Cookies:

3/4 cup (170 grams) unsalted butter, room temperature*
1/2 cup (105 grams) dark brown sugar
1/2 cup (100 grams) white granulated sugar
1/4 cup (60 ml) unsulphured molasses
1 large egg
1/2 teaspoon pure vanilla extract
2 cups (260 grams) all purpose flour
1/2 teaspoon baking soda
1/4 teaspoon salt
1 1/2 teaspoons ground cinnamon
2 teaspoons ground ginger
1/2 teaspoon ground cloves
Garnish:
1 cup (200 grams) granulated white sugar

*If using salted butter, do not add extra 1/4 tsp of salt mentioned later in ingredient list. 


Sunday, June 26, 2011

Salmon croquettes: a GREAT way to sneak veggies into picky petes

Serves 4

2- 5 ounce cans of salmon or tuna in water, drained
1 large egg
2 tbsp finely minced white onion
1 small carrot, finely shredded on a box grater
3/4 c dry bread crumbs
Salt and pepper
1 medium lime*
1 tbsp vegetable oil

Combine first five ingredients in a medium bowl.  Gently stir with a fork just to combine, adding just enough of the bread crumbs to bring the mix together (should take a scant 1/4 c).  Season to taste with s and p and a sprinkle of lime juice (this part is entirely up to you on how much is added).

Place remaining bread crumbs in a shallow dish, shape 1/2 cup balls of fish mixture into round cakes about 1/2 inch thick and place on top of crumbs. Bury the patty in the crumbs, being very gentle so as not to break the delicate cake.  At this point, you can make all the cakes, put them on a plate wrapped in plastic and keep them in the fridge until you're ready to fry them up.  Or you can...

...  Heat the oil in your largest frying pan over medium low heat; once a sprinkle of bread crumbs sizzles in the oil, the pan is hot enough.  Should be just enough oil to lightly coat bottom of pan.  Gently place croquettes into hot oil and fry 3 minutes or until lightly golden and crispy.

To plate (serving suggestions):  Place a scoop of white rice on a rimmed plate with a some corn sprinkled over it.  Place one or two croquettes along the side and sprinkle all with roughly chopped cilantro.  Squeeze some lime juice over all, concentrating on the fish cakes.  Garnish with lime wedge.

Thursday, June 23, 2011

Really and truly lemon cake


Have you ever had a lemon cake that smelled, looked and promised to be, but fell devastatingly short?  Being a fan of the lively cadmium citrus, I've been in search of a slice of cake that would make my taste buds sing and dance at the same time.  My hubby loves lemon cake so much that we chose to have our wedding cake flavored as such, which is a lot to say because he doesn't really care for citrus products at all. My son is known to eat lemons straight up, just slice it open and go to town on it.  So much so that my father in law planted a tree in his front yard that produces a bumper crop of semi-sweet fruit every season.  Just think copious amounts of plump, juicy orbs perfect for 50:50 lemon to sugar lemonade that'll cool you right off on the hottest of Summer days.  So it may come as no surprise that lemon cake is high on my list of "to perfect" (as in to craft until it's up to my standards) recipes.

  Thanks to Ina Garten of Food Network fame, I've discovered a wonderfully tart, dense but not too heavy and tender cake that is sure to please the most diehard lemon fanatic.  I prepared it as a poke cake since the glaze permeates the sponge and infuses the best lemon flavor that way and just for good measure, I used a canned butter cream frosting to carry over the heady citrus notes.  If you are a purist and you have all the time in the world, you can be my guest and make the frosting from scratch, too, but I err on the lazy side sometimes.  That and I'm in denial about how many sticks of butter it takes to make a good frosting, so there...  Try this out for your next birthday, tea party, simple snack or even wedding cake.  I promise, you won't be disappointed.


Adapted from Ina Garten's recipe for Lemon Yogurt Cake via www.foodnetwork.com 


Ingredients

  • 1 1/2 cups all-purpose flour
  • 2 teaspoons baking powder
  • 1/2 teaspoon kosher salt
  • 6 ounces container vanilla yogurt *
  • 2 ounces mayonnaise *
  • 1 1/3 cups sugar, divided
  • 3 large eggs***
  • 2 teaspoons grated lemon zest (2 lemons)
  • 1/2 teaspoon pure vanilla extract
  • 1/2 cup vegetable oil
  • 1/3 cup freshly squeezed lemon juice

For the glaze *

  • 1 cup confectioners' sugar
  • 2 tablespoons freshly squeezed lemon juice
*I used the rest of a can of lemon frosting left over from another cooking project, which suited this cake well as its uber-sweetness countered the tartness in the sponge.  Haven't tried the glaze, and will try it next time, but I would not reccommend doing both glaze and frosting.  Unless you have that big of a sweet tooth.  
* The original recipe asked for 1 cup of whole fat plain yogurt, but I only had a 6 ounce cup of low fat vanilla, so I made up the rest of the 8 ounces (1 cup) with mayonnaise.  I would dare to use up to 1/2 cup of mayo, but wonder if I can go even as far as to use a whole cup to match the fat content of the full fat yogurt.  All this if I wasn't being conscious of the calories and fat content of the cake in its entirety, of course. 
*** Again, this is what I had on hand.  The recipe actually asked for extra large eggs, which I'm sure would yield an even more tender crumb, but I think the cake came out fine with the large eggs.  Use what you've got, as long as the differences are minimal.  

Directions

Preheat the oven to 350 degrees F. Grease an 8 1/2 by 4 1/4 by 2 1/2-inch loaf pan. Line the bottom with parchment paper. Grease and flour the pan.
Sift together the flour, baking powder, and salt into 1 bowl. In another bowl, whisk together the yogurt, 1 cup sugar, the eggs, lemon zest, and vanilla. Slowly whisk the dry ingredients into the wet ingredients. With a rubber spatula, fold the vegetable oil into the batter, making sure it's all incorporated. Pour the batter into the prepared pan and bake for about 50 minutes, or until a cake tester placed in the center of the loaf comes out clean.
Meanwhile, cook the 1/3 cup lemon juice and remaining 1/3 cup sugar in a small pan until the sugar dissolves and the mixture is clear. Set aside.
Remove cake from oven and perforate thoroughly with a long barbecue skewer.  Slowly pour lemon syrup over length of cake while it is still piping hot.  Make sure liquid is soaked into sponge before de-panning to a metal rack to cool for at least an hour before frosting
OR
When the cake is done, allow it to cool in the pan for 10 minutes. Carefully place on a baking rack over a sheet pan. While the cake is still warm, pour the lemon-sugar mixture over the cake and allow it to soak in. Cool.
For the glaze, combine the confectioners' sugar and lemon juice and pour over the cake.

Thursday, June 16, 2011

Ginger Ale: My Next Quick Kitchen Project

Looks just like store bought, right?

Went to the supermarket the other day in search of the latest and greatest fresh produce and set my sights on the best thing in the whole world (when it comes to grocery shopping): the clearance rack.  On this particular day the squat little shelf was positively loaded with all sorts of goodies: 4 lb bags bursting-full with ripe roma tomatoes, emerald and ruby bell peppers bundled in sets of 3 and 4 and sacks of dirty Russets, each item mine for hardly a pittance.  Then I spied a jewel in the corner of the top rack, hiding amid the wealth of earthly goodies: a quart sized bag brimming with large, knotty fingers of ginger.   Ah, the things I could do with this spicy rhizome,  akin to the cuisine of every culture from Asia to America and I had enough to make my favorite dishes (ginger chicken, Pho Bo, etc.)

Everything you'll need for a refreshing drink

Three days later, I was in the kitchen whipping up something for dinner.  I had set Sydney in her crib where she was unhappily "taking a nap" (safely screaming her healthy little lungs out); she had been on me all day long and while I was enjoying the bonding time, being glued to the couch is not my m.o.  Then it occurred to me that I had two liters of something I never thought I'd be making at home: crisp and fizzy pale-hued ginger ale.  I unearthed the emerald plastic 2 liter from the freezer, undid the lid slowly and slightly to check for pressure, but nothing happened; to be honest, it looked flat.  Assuming the best and anticipating a quick cool drink, I twist the lid of and  BANG!  Let's just say, everything in the kitchen including from ceiling to floor was saturated in sticky ginger sugar water.  So much for sitting down with a plate of hot food and chilly pop.  Time to revisit the drawing board...

Ginger, lemon juice, and lemon zest "slurry"

  I've been intrigued by this sweet peppery elixer for a while now, although I've mostly only had the store bought stuff that's widely available to the masses.  One day my hubby brought home a four pack of Bundaberg Ginger Beer and my lips have been smacking after that bitey gingery spice ever since.  On the occasion that I had all of this ginger to spare, I decided to search for a recipe and try my hand at a home brewed version. To follow is a pleasantly simple recipe and directions for what might be your very own first bottle of home brewed ginger ale.  If done carefully, but not enough to pull your hair out, you'll find the results to be pleasantly sweet with just enough bite and flavor from the ginger that warms your throat all the way down while cooling you off in the most superlative way.  Just do your self a favor and take off the lid with WAY more caution than I did (like, go outside, don some safety goggles and duck for cover.  Juuuuuuuust kidding).  Happy brewing.

Combining water with the sugar, yeast, grated ginger and lemon.  Get ready to shake and shimmy that bottle!
Adapted from a recipe by David B. Fankhauser
( http://biology.clc.uc.edu/fankhauser/cheese/ginger_ale_ag0.htm )

Equipment: 
Microplate or fine-hole grater
A 2 - liter plastic soda bottle (NOT glass, which might shatter all over you as pressure builds inside)
Spouted pouring vessel (like a large measuring cup)
Measuring spoons (1/4 teaspoon and 1 tablespoon, to be exact)
Medium funnel
Fine mesh strainer/sieve

Ingredients: 
1 c white sugar*
1/4 tsp baker's yeast (the dry granulated stuff.  Got mine in bulk from Smart and Final for a wallet-load less than what you spend at the supermarket)
1 lemon (about 1/4 lb in weight), zested and juiced
Filtered water**

* I used what I had on hand, but the original recipe asked for cane sugar. I imagine brown sugar could be used too, and that it would give the ginger ale a color similar to that of the store brand stuff.  Never tried it, but plan to and will let you all know.
** Again, I used what I had on hand, but the recipe asked for "cold, fresh pure water".  I've heard it said that the cleaner the water, the better the final product, but I'm cheap and lazy and yeah.  So there.

Directions:

1.  Measure sugar and yeast, pour into clean dry bottle and shake to combine.
2.  Grate approximately 1.5 tablespoons/2 inches of peeled ginger into pouring vessel (I eye balled, but you can measure if you really want to be that careful).  Add lemon juice and zest and swish to combine then pour into soda bottle via funnel.
3.  Fill bottle with water, leaving at least 2 inches of head space.  This is your insurance policy against over flowing while the yeast and sugar do their magical thing and create carbonation.
4.  Shake until sugar is mostly dissolved (will look like cloudy dish water); place in warm location (i.e. top of fridge, most used bathroom, etc.) for at least 24 and no more than 48 hours or until you can't press the sides of the bottle in at all.
5.  Refrigerate at least 4 hours or until very cold.  THIS is where caution should be used in opening the bottle as there is no telling how much pressure has built up inside.  Just like opening a regular soda bottle, crack it open a tiny bit, turning the lid slowly while watching for bubbles/carbonation.  If you see anything crazy happening, quickly tighten lid and carefully try again.

Recipe yields 2 liters (after filtering)