Tuesday, March 29, 2011

Whiskey Chicken: My Way W/Bourbon Chicken


It's a rare thing for me to buy skinless, boneless chicken breasts these days.  For one thing, they're so darned expensive most of the time, I'd rather do all the work myself and pocket the extra eight some-odd dollars I would have spent.  Ribs attached and skin on, to me, equals longer cooking time, but results in AWESOME flavor, texture and all-over aesthetic appeal.  But low and behold, i found a good sale on boneless skinless chicken boobs at my local gigantic food storage house (known to Americans as "Suuuuupermarkets").  $1.09/lb, and that wasn't including the styrofoam plate or plastic wrap.  Got four HUGE breasts for four dollars, a deal any cool would probably be quite proud of (or most men, for that matter).

  Another problem is, because I know how to cook and I get bored doing the old humdrum meat, starch and two veg' deal, the prized meat has to sit in the fridge for  a while until I figure out how to present them without annoying myself.  Much to my husband's chagrin, although he usually enjoys what I come up with, I like to experiment with my food.  Ah, yes, the bane of being married to a foody.  Any how, this time around, the food court was what sprung to mind as I thumbed through my mental cooking Roladex: bourbon chicken!  In came another problem: I'm eight months pregnant, my feet are useless stumps of soreness at the ends of my swollen legs.  Going to the store could prove quite problematic, if not very painful, at this point in the game, plus even before I reached this current state, I never cared for bourbon or most of the other hard liquors out there.  WHAT DO I DO??!!

  A quick search on allrecipes.com produced several tutorials for our beloved food court staple, all insisting on the use of that darned nasty tasting brown hooch.  Then it occurred to me: we were still in the possession of a bottle of Jameson Irish Whiskey from several moons ago when it seemed like a good idea on St Patty's day.  The gamble of this swap seemed irresistible and worth it since my craving for poultry goodness was snowballing by the second.  So here it is: Whiskey Chicken, my way.  Take it or leave it!

Ingredients:

1 1/2 lb skinless boneless chicken breasts or thighs, cut into 1 inch cubes (thighs will be more succulent, but it's your shout)*
3 tbsp vegetable oil (about 5 fast turns from a squeeze bottle)
Another 1 tbsp oil (this will make sense if you read the directions)
1/4 c finely diced yellow onion**
1/4 c chicken broth (homemade preferable, or use Swanson's Low Sodium Chicken Broth)
1/4 c grape juice (or whatever juice you've got on hand)
1/4 c Jameson Irish Whiskey
1/4 c soy sauce
2 tbsp brown sugar
3 HUGE cloves of garlic, grated (micro plane or a fine-toothed handheld grater works best for this job)
1/2 inch piece of ginger, grated (repeat above statement)
2 tbsp cider vinegar
1 tsp red pepper flakes
1/2 tsp freshly cracked pepper
1 tbsp corn starch

*If you opt to leave the skin on, you will find this to be a very greasy dish.  Trust me, I've made this mistake, served it to my Mum and now I've lived to tell you NOT to do this.
** The instructions from the allrecipes.com recipe said to use 1 tbsp of dried onion flakes, but I don't keep those on hand.  I think onion powder, about 1 tsp, would do the trick too if you're feeding people who have onion-detectors in their mouth/nose.  I chopped my onion pretty fine and it melded nicely with the sauce, plus the long cooking time helps, too.  If you choose to use powder, you'll whisk it into the liquid step of this here recipe.  Because powder and hot oil burn together, donchaknaw?

Directions:

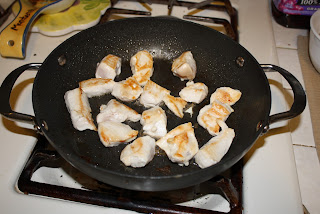
Browning the diced cluck cluck.

Frony, fron, frond! So tasty and... good!

Heat a medium non-stick pan over medium heat.  Add oil and brown chicken in 2 batches, or until all is processed.  Should take about 2 minutes per side for nicely tanned chicken.  Chicken will still be quite pink on the inside.  Transfer to a bowl and set aside.

Whisk together everything from broth to cracked pepper.  Add an extra tablespoon of oil to that lovely frond-y goodness collected at the bottom of your pan (or the brown bits) followed by the diced onions.  Stir to collect the flavorful brown bits.  Boost heat to high and pour in most of the whiskey-broth mixture, save for about 1/4 cup or so.  Allow liquid to come to a boil.

Whisk corn starch into remaining liquid then quickly whisk the slurry into the boiling liquid.  Add browned chicken to the pan and continue to boil for about 5 minutes or until chicken is cooked through.

Reduce heat to low and cook for at least 15 minutes, or if you have time, up to 4 hours, simmering to tenderize chicken pieces*.  Serve hot over Jasmine rice with your choice of steamed vegetables and a couple spoon-fulls of the cooking liquid.  Liquid should be viscose but not gelatinous.  If necessary, add extra corn starch mixed with water 1 tsp at a time until desired consistency is reached.

*This is a great dish for the crock pot, since you can allow it to stew for several hours throughout the course of the day.  Just add the chicken to the boiling liquid, skip the slurry and simmer for as long as you can (up to 8 hours).  When you're ready to serve, add slurry of corn starch and cold water and bring to a boil until thickened to desired consistency.

Thursday, March 24, 2011

Cari Ga: Vietnamese Chicken Curry


Apparently I posted this on my Facebook page a while back, but I honestly have no recollection of such an event.  This is the closest thing to what my Mẹ used to make (and still occasionally does): a flavor-rich soup dotted with chunks of carrot, potatoes and best of all tender dark and white meat chicken.  For the flavors to meld and for the chicken to become toothsome and tender, the broth and chicken, along with all the spices and aromatics, are brought to a boil, then left to simmer over super-low heat for at least a few hours.  Your entire house will be perfumed with a heady bouquet of cumin, coriander, and turmeric, all of which are the signature of a fine curry powder.  Simple to produce, with plenty leftover to freeze for later if you choose, my favorite way to serve this is lovingly drizzled over a bed of tender Jasmine rice, fresh out of the rice cooker, with a generous sprinkle of rough chopped scallions and cilantro.  And just to make this a triple-starch kind of meal, I serve a skinny French baguette, cut into thick fingers and lightly toasted under the broiler, as a means to sop up all of those glorious tawny  juices.  This is my robust provocation to America's bland chicken noodle soup, an old stand-by that's often touted as "comfort for the ailing", though it doesn't hold a candle to even the memories of slurping down a bowl of this delicious consomme.  Bring out the napkins and rev up your taste buds for a taste of Vietnam you'll never forget.  


Adapted from Mai Pham's Pleasures of the Vietnamese Table "Bun Cari: Curry Noodle Soup with Chicken"


Ingredients 


1 tbsp vegetable oil
1/2 of a large onion (about 1 lb), diced
2 cloves garlic
1 tsp ground chili paste (optional)
1/4 tsp cayenne pepper (optional)
3 tbsp curry powder
1/2 lb bone-in skinless chicken thighs, sliced into 1-1/2  inch thick chunks
1/2 c unsweetened coconut milk
OR 1/2 c milk (whatever fat percentage you have on hand; higher percentage = richer results)
4 c homemade chicken stock (see recipe below)
OR 
4 c store bought chicken broth (recommended Swanson's Low Sodium Chicken Broth)
1/4 tsp ground turmeric
3 tbsp fish sauce
1 tsp sugar
1 large Russet potato, peeled and cut into 1 inch square cubes
2 medium carrots, peeled and cut on the bias into 1 inch slices
1/2 c cilantro, stems and leaves rough chopped
1 c shredded romaine
1 c bean sprouts
3 c cooked Jasmine rice
OR 
1 lb dried bun (small rice vermicelli or rice stick noodles), cooked per package directions
4 scallions, thinly sliced


Chicken Broth


1 4 lb whole young chicken, giblets removed
2 stalks of celery
2 carrots
1 large onion, quartered with skin on
8 qts cold water, plus more for topping off
1 tsp black pepper corns
1 large bay leaf


Combine all ingredients in a large stock pot, cover and bring to a boil.  Remove cover once boiling to prevent overflow.  Allow to boil for at least 20 minutes before lowering heat.  Simmer for at least 4 hours, carefully skimming any scum or muck from the surface every so often.  Drain through a fine mesh sieve, separating chicken from aromatics.  Remove skin from chicken, then chunk or shred the flesh; set aside for later use.  Should produce about 4- 32 ounce containers of clear stock.


Directions


1.  Heat oil in a medium pot over moderate heat.  Add the onion and garlic and stir fry until onion turns translucent (watch this step carefully, as minced garlic has a tendency to burn quickly).  Add the chili paste, cayenne (if using either) and chicken and stir to coat, and until all sides are lightly toasted, about 3-5 minutes.  Add chicken broth, turmeric and sugar.  Bring to a boil, then reduce heat to a simmer 


2.  Add potato and carrots and continue to simmer for 20 minutes or until potatoes are tender.  Stir in coconut milk and fish sauce and continue to simmer for another 30 minutes.*  Taste and season with either more fish sauce or salt, but go sparingly because flavor and salinity will intensify as it sits.  When you are pleased with the flavor, arrange a scoop of rice in the center of a shallow saucer and course a hearty ladle or two of the soup over it.  Alternately, if using noodles, reheat a serving until they are tender and steaming before adding soup.  Shower with cilantro and scallions and a heavy grind of freshly cracked pepper over all.  Serve plates of Romaine lettuce, cilantro and bean sprouts and freshly toasted fingers of French baguette bread family style for people to add as they please.  SOUP IS ON, BABY!


* Adding the fish sauce at the last minute like this will prevent the strong aroma from permeating throughout your house.  Additionally, adding the coconut milk/milk at the last second will prevent curdling.  


Friday, March 18, 2011

Rack O' Lamb with Remoulade Crust

This recipe, like some of my other ones, looks daunting because of the sheer length and detail of it.  Please don't be fooled, Save for the rack of lamb, I'm willing to bet that most of you have the bulk of the ingredients on the ready in your pantry and fridge.  The "procedure" is very simple and moves quickly if you lay everything out and do things in an orderly fashion.  This is one of those recipes where having your mise en place (literally translated to "putting in place", and basically means having everything in order before you start)  is imperative for feng shui to exist in your kitchen, and for your sanity to remain intact.
Close your mouth, dear.  It's not polite to stare (but in this case, it ain't gonna hurtcha!)  

With that said, this is not my first time making a rack of lamb.  Growing up in Australia, you'd think that I would have eaten my fair share of chops and racks, but until about 2 years ago, I was a virgin in these waters.  I, like many others, had heard horror stories of the young meats gamey-ness and strange odor and had just assumed I wouldn't care for it.  After much coaxing (and even the consumption of some elk, venison and other game meat generously gifted to us by a dear family friend), I decided to try my hand at preparing this BEAUTIFUL choice cut.  Now, I'm preaching to the world that lamb is indeed a delicious and easy to prepare protein that has amazing depth of flavor and impressive on the plate.  And to those mums and dads out there who think their kids won't want to even give this a whirl, present these babies as meat lolly pops that taste like the best steak they've ever had and see them turn into mini-foodies.


Everything you'll need for a successful Rack o' Lamb if you choose not to make the remoulade.


2 Slices of your favorite bread (I used 1/2 of an everything whole wheat ciabatta roll)
4 cloves of garlic
2 tbsp oil
2 1/2 tsp dried or 2 tbsp fresh rosemary
1/4 tsp black pepper
1/2 tsp salt

Preheat oven to 450 F.  Cut/tear bread into chunks; coarsely chop garlic cloves.  Place both in bowl of food processor with oil, rosemary pepper and salt.  Pulse to form a wet sand consistency.  Remove blade from bowl, rinse and load into dishwasher.  Set bread crumb mixture aside.

A good coarse consistency = tasty, crusty goodness! 


Remoulade (mustard sauce; adapted from Emeril Lagasse's recipe found on Foodnetwork.com)

3 tbsp dijon mustard or a good strong brown mustard
3 tbsp yellow mustard
1 heaping tbsp mayonnaise
2 tbsp chopped parsley
1/4 c fresh lemon juice
1 tsp whole mustard seeds
3 - 5 tbsp olive oil
2 tbsp garlic, chopped
3 tbsp ketchup
4 scallions, medium in length, rough chopped
1/4 medium (about 1/2-3/4 lb) onion, roughly chopped
1/2 tsp cayenne pepper
1 tsp ground pepper

or 2 or 3 tbsp dijon mustard

Combine all ingredients in a food processor, Pulse until everything comes together in a thick paste and no large chunks remain.  Makes about 1 1/4 cup.


1 1lb Frenched lamb rack
Salt and pepper
1 tbsp oil

Seconds before getting browned into tender submission


If one is available, pre heat a large cast iron skillet or griddle over medium heat for at least 5 minutes.  Alternately, a heavy-bottomed stainless steel pan works just as well; pre heat over medium heat until splash of water disappears immediately.  Rinse lamb and pat dry with paper towels until the surface is dry enough that you can click our fingers.  Season with salt and pepper to taste (about 1/2 tsp each).  Drizzle oil onto hot cooking surface and sear meat at least 2 minutes per side including the ends, or until golden brown all over.

LOVE that sizzzzzzzzle!


Place a foil-lined baking sheet into hot oven.  Cover Frenched bone ends with a bit of foil to prevent charring.  Spread a thin layer of remoulade* over all exposed surfaces of browned meat.   Press bread crumb mixture over fatty top surface of rack, creating a thick, consistent layer.  Remove baking sheet from oven, apply cooking spray and place breaded rack in the center.  You should hear a soft sizzle, which will continue to sear the bottom of the rack.  Place in hot oven and roast for 15-20 minutes, or until meat thermometer inserted into side of rack reads 140 (160 for well done).  When time is up, remove rack to cutting board and tent loosely with foil for 10 minutes before slicing 2 chops at a time.

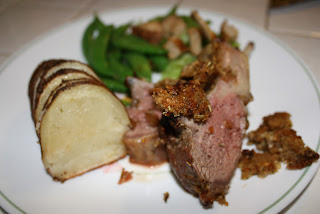
My plate: a couple of medium-well chops, baked potato, roasted snap peas and a light salad.  Or, what my dear mother in law would refer to as "meat and puhtaytuhs" (it's a midwestern thing).   


Serves 2 really hungry people or 4 with sides and salads.

* You could easily use plain dijon mustard, about 2 to 4 tablespoons should be adequate to cover.

And hubby's more attractive plate.  If you slice 'em 2 x 2, the crust doesn't fall off.  Either way, it all tastes faaaaaabulous! 

Tuesday, March 15, 2011

Pho Bo: the best beef broth soup you'll ever taste

Mot tho pho bo dap va dam da (probably didn't spell any of that right, but my Viet peeps know what's up :-))

Okay, it's taken me 27 years to get up to this point and it's been well worth the wait.  About 17 of these "long" years were spent observing and taking mental notes as I watched my harried mother collect a furious mise en place of exotic whole spices, fresh choice cuts of lean ruby red beef, several pounds of some BIG marrow and knuckle bones, and an array crisp emerald herbs.  Nothing compares to homemade pho, a medium that is especially indicative of Vietnamese cuisine.  It starts humbly with just beef bones and a number of gallons of water, grows character as it is infused with aromatics such as star anise and ginger, and is finished to a toothsome and savory bite with curls of rare beef, shaved thin across the grain.  The magic transpires here, in the finale of this lengthy-but-rewarding cooking adventure as the beef is quick-blanched into delectable submission by piping hot broth, rendered over the course of a day from the depths of its skeletal counterparts.  Pho is what any person who has had a well-prepared bowl of soup will testify to as the most enthralling consommé available outside of a restaurant, and WAY outside of any lowly canned product or processed instant package-o'-sodium you can get in a mega-mart.  This is love in a bowl.

Ingredients - Broth:

3-5 lbs of large beef bones (I used a combination of ribs and oxtails)
Salt
2- 3 inch fingers of ginger
1 large yellow onion (I used a red onion because they were cheaper at the time to no ill effect)
5 whole star anise
6 whole cloves
2 whole cinnamon sticks
1 tsp whole black peppercorns
1/4 c fish sauce, plus more to taste (Squid, Viet Huong, and Thai brands are a few readily available in supermarkets nationwide)

Make a highly-saline solution of 1/2 c salt about 6 quarts of water and submerge beef bones in it for no less than an hour.  Drain and set aside.*

Set broiler to high heat and place ginger and onion on a foil-lined sheet pan under hottest area.  Cook until blackened on all sides, turning often and watching closely; should take about 10 minutes.  The aromatics should look something like this:


Allow to cool, then peel outer layer of char off of the onion and bruise the ginger with the broad side of a heavy knife.  Set aside.

In a dry frying pan, heat everything from star anise to peppercorns, one at a time, until fragrant and just barely starting to darken.  Place all, with ginger and onion into a clean square of cloth/cheese cloth* and tie into a satchel with a length of cotton string.

Replace beef bones into a large stock pot (at least 10 quart size is best) and cover with water to about an inch and a half from top rim of pot.  Bring to a boil, then lower heat and simmer for 1 to 2 hours.  Skim any debris and scum off surface of water as the broth simmers.  After 2 hours are up, add aromatic satchel and continue to simmer for another 2 hours, continually skimming.  Over the long simmering time, water will evaporate, so keep a pitcher of water on the ready to top off whatever is lost.

After about 4 hours of total simmering time, add fish sauce and a teaspoon of salt at a time until desired saltiness is achieved.  Broth is now ready to eat, but is much improved with a night's rest in the fridge, with bones and spice satchel steeping.

Strain cooled broth through a clean cloth/cheese cloth set over a sieve, gathering corners of cloth to expedite the flow.  Squeeze as much of the broth out as possible and discard aromatics.  Taste and re-season until you are happy with the final product.  Broth should be clear with little bubbles of flavorsome beef fat afloat on the surface.  The fat and long cooking time have extracted gelatin from the marrow in the bones, which will allow the broth to gel slightly when cooled in the fridge.  This is one of the signs of a well made broth.  To remove much of the fat content of the broth, allow to cool over night in fridge, during which time a cap of solid fat will form over surface of the liquid broth.  Simply remove this cap and discard.  Heat and serve broth.

*This salt soak will aid in the removal of any impurities and muck from the bones and help the final broth to be more clear and aesthetically pleasing.

Noodle/herb/meat assemblage:

16 oz fresh rice stick noodles
1-2 lbs of very lean beef (eye of round or  petite sirloin/ regular sirloin is best), frozen for 1/2 hour and shaved as thin as possible
1 small bundle of mint, whole
1 small bundle of cilantro, roughly chopped
4-5 scallions, finely sliced
1/4 lb fresh bean sprouts, rinsed and drained
Hoisin sauce
Sriracha/Rooster sauce
1 lemon, cut into eighths lengthwise
pepper
Check out my MAD slicing skills!  Wafah-thin beef attained by slicing off of a semi-frozen hunk of petite-sirloin.

Fengshui LOVES the beef!


Rice stick noodles I picked up from my local Asian mega mart.  

Noodles, beef and herbs ready for some hot and brothy action.


Bring about 6 cups of broth to a rolling boil.  Bring a small pot of water to a rolling boil, add entire package of noodles and remove from heat.  Allow to sit for about 10 seconds or until noodles are tender.  Drain and rinse with warm water.  Portion noodles out, about one and a half cups per serving.  Arrange sliced beef over noodles in a thin layer, taking care not to overlap slices.  Ladle hot broth over raw beef and noodles (this will instantly cook the meat to a safe eating temperature), sprinkle with fresh herbs and serve with lemon, Hoisin and Rooster sauce and freshly cracked black pepper.  It's been a long journey to get to this point, so bask in the delicious scent of your beautiful bowl of noodley-steaky-herbaceous goodness.  Now.... DIG IN!  **This is a great opportunity to hone your chopsticking skills.  Those noodles and the beef are slippery buggers, but it's so fun to go soup-fishing, so give it a try.**


Friday, March 11, 2011

Spinach Pesto: Getting your Pop Eye on!

Here's some good news for all you veggie lovers and people who are trying to "diet" (and I mean, really trying!): spinach pesto can pack as much as a cup of calcium-rich leafy greens into your daily meal plan without too much pain.  Pesto, in laymen's terms, is a sauce/dressing traditionally made from basil, pine nuts, parmesan, and EVOO (all four good-for-you-items, in moderation, of course).  It's great on pasta, most forms of protein (including fish and "white" meat such as pork and chicken) and smeared on bread or as a base for a simple pizza.  It's very simple to make, lasts for a while in the fridge (or months in the freezer), and tastes AWESOME.  So much better, IMHO, than having to gnaw on a head of lettuce covered in sticky dressing dotted with fried croutons for "flavor and texture" when you're supposed to be watching what you eat.
The final product: a fine-ground pesto perfect for adding flavor to just about anything.

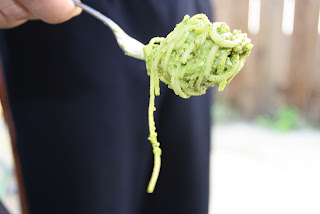
Took a break from eating my bowl of angel hair, spaghetti and chicken coated in pesto.  For a carb-laden dish, this had a bright, zingy flavor, uncommon for most pasta dishes. A single serving (about 1 cup) packs approximately 1 cup of garden-fresh essential vitamins and minerals.   

  In this blog, I'll be covering another form of the pesto powerhouse using a veg that you either love or hate.  My job here?  Hopefully to help you *at least* try delve into the greener side of life, the side your mother so bull-headedly blackmailed you with: "If you want a cookie you'll have to eat all of your (insert green item here)".  This version is adapted from Giada Di Laurentiis' recipe for Grilled Chicken with Spinach and Pine Nut Pesto.  It includes each of the ingredients indicative of a good pesto, minus the expensive grocery list, all without skimping on flavor, body or texture.  I hope you dig this stuff as much as I now do.  
A twirl of noodles seconds before meeting its delicious fate.  


Without further adue, The Ingredients...

A scant 1/4 cup blanched, slivered almonds
About 2 ounces of Kerrigold Dubliner cheese (2 x 1/4 inch slices off a 3 x 8 square inch block)
2 cups baby spinach, pre-washed or washed and well dried
2-3 tsp fresh lemon juice
1/4 cup extra virgin olive oil (this is one item I didn't skimp on because it can make or break the flavor of your pesto)

... And the recipe:

Heat a small frying pan over medium heat and add almonds, toasting until just fragrant.  Remove to a clean plate and allow to cool to room temperature or place in freezer to expedite cooling process.  Set aside.

Slice cheese off the block and break into small chunks.  Place in bowl of food processor with almonds and pulse until the consistency of oatmeal.  Scrape sides of bowl with rubber spatula.  Add spinach, lightly packing down to ensure proper contact with processor blade.  Pour lemon juice over top and pulse 4-5 until most of the leaves have been coarsely chopped,  Scrape bowl down again.

Slowly drizzle in EVOO while running the processor until a finely-ground paste forms, or until desired consistency is reached.  Makes approximately 1 full cup.

To store, pour into a clean bowl and press a length of cling film over as much of the surface as possible.  This will slow the oxidation process and keep the sauce bright green for about a week in the fridge.  For long term storage, carefully pour into small zip loc baggie, pressing all excess air out.  Flatten sauce into a single even layer and freeze flat until firm.  Break off chunks as needed, no need to thaw if using in hot applications like Spaghetti.  Bon appetit!

Wednesday, March 9, 2011

Egg, Salami, and Spinach Pizza on a Pepper Jack Quesadilla

I'm making this a full-blown entry because, once again, my verbosity has gotten the best of me.  Or it is just too much for foodnetwork.com's server to handle.  How can one express the ins and outs of a recipe in less than a thousand words?

  Anyhow, I found this recipe by Ellie Krieger last night while trying to figure out how to get rid of a HUGE bag of baby spinach before it it goes bad.  It's actually called "Egg, Ham, and Spinach Pizza" but half of the ingredients were missing from my pantry/fridge, so I had to make do.  Here's what I wrote:

"This is a fabulous recipe that I of course have botched.  Firstly, I didn't use an actual pizza crust; I only had whole wheat tortillas, so I made a quesadilla out of one with pepper jack.  This provided a substantial crust and actually crisped up pretty nicely without burning.  Didn't have ham, so julienned three slices of salami.  Nixed the parm (didn't have it, not even the stuff you can shake out of a bottle).  So, made a nest of spinach and julienned salami over uncooked quesadilla and cracked egg into nest.  Drizzled with O.O. and seasoned with s & p.  First ten minutes of cooking time, egg appeared extremely runny.  Turned pan and continued cooking for 5 extra minutes and egg was WAY overcooked.  My faux pas.  Will definitely take out of oven next time and just let carry over do its magic. In an effort to freshen things up, I added two slices of beef steak tomato, raw and straight out of the fridge, right over top of everything. Thanks for the great recipe, Ellie.  I'm confident next time it will be even better."

Oh, and here's the recipe, just incase you're wondering how much I really did change this thing up:

Ingredients

  • 1 store-bought baked thin-crust pizza shell, preferably whole-wheat, such as Boboli
  • 4 cups (about 4 ounces) baby spinach leaves, thinly sliced
  • 2 teaspoons olive oil
  • 3 ounces prosciutto di Parma, thinly sliced
  • 1/2 cup grated Parmesan (1 1/2 ounces)
  • 3 cloves thinly sliced garlic
  • eggs

Directions

Preheat oven to 450 degrees F. Place the pizza shell on a cookiesheet. Scatter spinach all over crust. Drizzle with oil. Evenly distribute prosciutto, Parmesan and garlic on top of spinach. Crack eggs onto pizza, roughly positioning 1 yolk on each pizza quarter. Bake for 12-15 minutes, until spinach is wilted and egg whites are just fully cooked. Cut into 4 large slices.